After I had felted an owl for Ted two Christmas Eve’s ago, I then had to get on with making him a fleece stocking. I was feeling guilty for making Elsie her first stocking but hadn’t got round to doing one for Ted. He, being only nearly two had absolutely no idea whether his stocking was homemade or not, but I still felt guilty. So on Christmas Eve, having prepared loads of food for the holidays including a big turkey and trimmings, several Tupperware boxes full of biscuits, cakes, homemade chocolates etc., and having completed a soft fleecy owl, I then started work on making Ted a stocking. I used soft turquoise fleece with a lime green trim and added a little, needle felted polar bear using natural coloured merino fleece.
Sunday 12 December 2010
Felted Owl for Ted 2008
Ted loves owls and I’d been wanting to make him one for ages. Then after doing a brilliant training course where I learnt how to do needle felting, I decided to put these newly acquired skills into making him a soft, part felted owl.
I used coloured merino fleece to create the details on the eyes and wings and then felted them together using a tiny, barbed felting needle. Such an amazing technique, I understand how it works but it still blows my mind how quick and relatively easy it is. I created the body using lovely soft turquoise fleece stuffed with filling from an old pillow. The buttons for eyes finished him off.
I made this on Christmas eve 2 years ago and when Ted opened it the next day he cuddled it for ages and he has slept with it ever since. Unfortunately felted items should probably have a label saying “this is not a toy and is for purely decorative purposes” as he has pretty much cuddled all the fleecy bits off and the poor owl looks about 20 years old not just 2! It doesn’t matter though; he still loves his owl regardless of its shabby appearance.
60th Birthday Cake
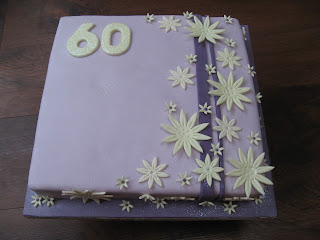
A friend Elaine, asked me to make a cake for her mum’s 60th birthday. I was pleased that she didn’t want me to make a massive 60 and instead gave me a lovely, loose brief, saying that her mum loves flowers and shopping and her favourite colours are lilac and lemon.
I had a vague design in my head and as I worked on the cake I added a few more details as I went along until I was happy with the final design.
The cake is a vanilla sponge with vanilla buttercream filling. I covered the cake with a light lilac fondant and added a deep purple fondant ribbon and base. I gave it a light layer of pearlescent spray to make it look more luxurious.
I mixed up some subtly different lemons shades of fondant mixed with Mexican paste which I used to stamp out 3 sizes of daisy shapes. I added indents for the centre and used a knife to add small details on the petals. I left the large flowers to dry on top of some pots and lids to create a slight curve. The bigger daisies had a small flourish of lemon glitter and I added dark purple centres to the tiny blossoms, to tie in with the ribbon and the base.
I am very pleased with the result, it was really nice to make a ‘grown up’ cake!
Tuesday 30 November 2010
Past Work: We Love Your Books Exhibition 2008
For a while I was invloved in a fantastic annual exhibition called We love Your Books. Each year they give you a theme to go away and create something lovely and bookish to submit for the exhibition. I've had several pieces of work accepted so far but the last few years have been way too hectic with children and teaching so i've been unable to create the work for the last exhibitions. Maybe next year...
The theme for my last 2 pieces of work was simply: RE, and work could be related to these letters in whatever way took my fancy.
The first piece was entitled Dressmaking Reassembled 2008 and here it is along with my personal statement from the exhibition.
My work explores and celebrates the initial ideas and processes involved in creating many everyday things including works of art.
For my second entry to RE, I collaborated with a friend who writes lovely stories, to create a boxed book work.
We Love Your Books is a voluntary organisation and is superbly organised. They sell their catalogues online which helps to fund some of the costs of running the exhibitions my work is featured in the following publication; we love your books 2005 – 2009 five years of experimental artists' books exhibitions
The theme for my last 2 pieces of work was simply: RE, and work could be related to these letters in whatever way took my fancy.
The first piece was entitled Dressmaking Reassembled 2008 and here it is along with my personal statement from the exhibition.
‘Dressmaking Reassembled’ 2008
I am interested in the construction and form of many everyday things including the making of a piece of art.
I collect and use a wide range found materials in my work including vintage fabrics, books and dressmaking patterns.
In this bookwork I chose to work with a lovely old school text book from 1959 which serves to teach the reader a range of needlework and dressmaking skills. I decided to reassemble pages of the book to form a miniature fifties style prom dress.
My work explores and celebrates the initial ideas and processes involved in creating many everyday things including works of art.
‘The Little Button’ written by Allison Green 2007
Remember: ‘The Little Button’ limited edition bookwork
Designed and produced by Imogen Davison 2008
Bound in vintage dress fabric and button. Boxed set includes vintage lipstick and tape measure contained in an antique drawer.
We Love Your Books is a voluntary organisation and is superbly organised. They sell their catalogues online which helps to fund some of the costs of running the exhibitions my work is featured in the following publication; we love your books 2005 – 2009 five years of experimental artists' books exhibitions
Thursday 21 October 2010
Lois and Dans Wedding
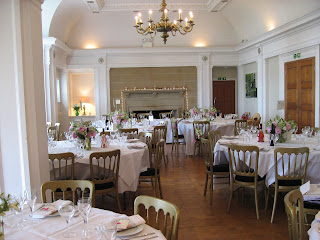
I mentioned in a previous entry about my sisters wedding in July. It was an absolutely fantastic day and every detail was gorgeous. Lois looked absolutely stunning, Dan looked great. The spectacular venue was designed by one of my absolute favourite architects; Charles Voysey and the house was full of lovely romantic details like this forged heart letterbox.
I have a small business making wedding stationary which has been placed on the back burner since I’ve been teaching again, but I was able to dig out my equipment to design and make all the stationary for Lois and Dan’s wedding. The design motif was taken from the wallpaper in my dining room which we discovered was an original Charles Voysey textile design. I photographed then redrew the motif on PhotoShop and used it to adorn all the stationary from invites, to menus, table plan, guest book etc. etc.
Lois is a whiz on the sewing machine and she made all the napkin rings using a gorgeous Cath Kidston floral fabric, finished with my name tags.
The whole room looked amazing and for once it was great to be at a wedding to see the stationary I had designed, actually in place.
Tuesday 5 October 2010
Mini Maple Pecan Nutcakes
I’ve seen cakes made using a square of greaseproof paper instead of a paper cake case, which look really nice. I have planned on making these myself but then I found some for sale in my local cake supply shop. These would be perfect for the mini versions of the caramelised nut housewarming cake mentioned earlier.
After the cakes were cooked and still warm from the oven, I added a delicious buttery caramel which was slightly different from my original version which used golden syrup, butter and brown sugar. This time, to marry with the pecans, I used some of the maple syrup left over from Ellie’s muffins in place of the golden syrup.
What a triumph! The maple butterscotch soaked into the cake giving it a deliciously moist texture and provided a lovely glaze to the pecans.
Friday 1 October 2010
Girly Pink Cupcakes
I was testing to see if the pink paper cases I’d bought, would hold their colour when cooked (cheaper coloured cases tend to look greasy and are often a waste of money). I often use the metallic ones as they stay looking great after cooking. You do have to be careful when picking them out of the muffin tins as they stay really hot.
First Cupcake Order
Since putting up my cake photos on my little facebook group, I’ve had loads of comments from people encouraging me to set up a small business. It’s a nice idea but I don’t have much spare time with teaching and my children. I’d love to be able to combine the both and maybe when Ted is at school full time, I may have a few more hours. For now I’m happy to make things for my friends and family and to do the odd commission. My first cupcake commission was requested last week when I was asked to make 20 cupcakes in 4 designs chosen from my previous creations.
I started by making the two styles of butterfly using half Mexican paste and half fondant coloured light pink.
I used pearlescent spray on the small butterflies and used pearlescent powder colour to paint the larger butterflies.I left them to dry on top of little folded cards. (In this case, freebie game cards from when Neil took the children to Bella Italia)
3 days later... perfectly dry butterflies.
Making the cupcakes…
Boxed up and ready to go…well almost….I bought the box which is specially designed for transporting cupcakes safely but clearly not designed for fairly tall piped cakes. I realised that it was going to squash the butterfly cakes so I had to cut off the top and add wooden skewers in the corners to raise the lid and keep the cakes in perfect condition.
Subscribe to:
Posts (Atom)


